|
<< Click to display Table of content >> Text |
  
|
|
<< Click to display Table of content >> Text |
  
|
Three tools can be used to create texts.
Setting text
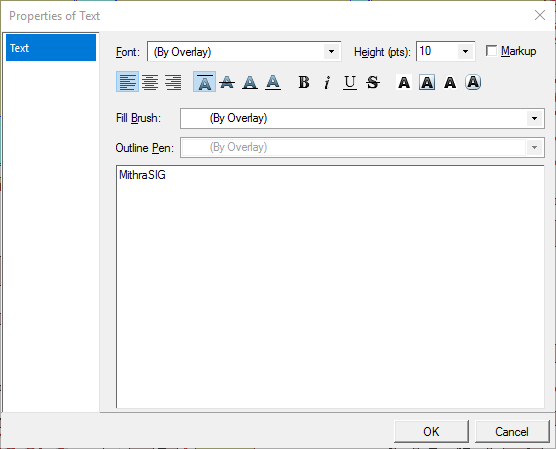
In the 3 cases when creating a text, the following window appears. It allows to write the text and set it.

Text settings window
•Font: the font used to display the text.
•Height: the height of the text taille du texte. be careful, the height is in points (3 points = 1 centimeter) and not in pixels. Enter a negative value allows the text to remain the same size regardless of the viewing scale.
•Markup: enable/disable the advanced style functions. With this option, the text can be personalized. For this, you have to enclose the text with the following symbols:
- * * for bold text (example: *bold text* gives bold text).
- _ _ for italic text (example: _italic text_ gives italic text).
- ^ ^ for superscript text (example: ^superscript text^ gives superscript text).
- ~ ~ for subscript text (example: ~subscript text~ gives subscript text).
- - - for strikeout text (example: -strikeout text- gives strikeout text).
•Horizontal alignment: ![]() align the text to the left, centre, to the right.
align the text to the left, centre, to the right.
•Vertical alignment : ![]() align vertically the text to the top, centre, to the baseline, to the bottom.
align vertically the text to the top, centre, to the baseline, to the bottom.
•Styles : ![]() makes the selected text bold, italic, underline, strikeout.
makes the selected text bold, italic, underline, strikeout.
•Effects : ![]() gives the selected text an opaque background box, an outline background box, outline, outline background box rounded corners.
gives the selected text an opaque background box, an outline background box, outline, outline background box rounded corners.
•Fill Brush : color of the text.
•Outline Pen : color of the outline of the text.
Point Text
To create a Point Text, click on the button ![]() from the ribbon Geometry, in the group Creation. Then, trace a line for the direction of the text.
from the ribbon Geometry, in the group Creation. Then, trace a line for the direction of the text.
Box Text
To create a Box Text, click on the button ![]() from the ribbon Geometry, in the group Creation. Then, place the object where you want.
from the ribbon Geometry, in the group Creation. Then, place the object where you want.
Box Label
To create a Box Label, click on the button ![]() from the ribbon Geometry, in the group Creation. Then, click in the graphic window to set the label origin, and click a second time to place the text.
from the ribbon Geometry, in the group Creation. Then, click in the graphic window to set the label origin, and click a second time to place the text.
Edition
To edit a Text object, select it and do a right-click/Properties.../Text.
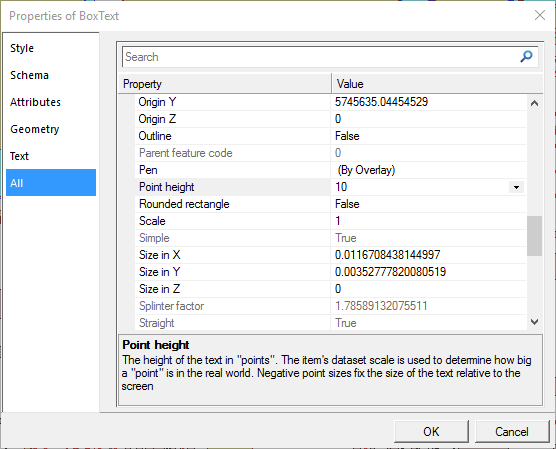
Note that to modify the height of Box Text and Box Label, you need to edit after the creation. This is caused by the fact that the height of these objects are the same as the one set during the last creation of a Text Point. So, to modify the height, you need to use right-click/Properties.../All.
A noter que pour modifier la taille des objets Texte Boîte et Label Boîte, il faut passer par l'édition après la création. En effet, la taille lors de la création étant fixée sur celle de l'objet Point texte dernièrement créé. De ce fait, pour modifier cette taille, il faut sélectionner l'objet puis clic-droit/Propriétés.../Tout.
Modify the attribute Point height for a Box Text (in points).
Modify the attribute Character height for a Box Label (in metres).

Modify the height of a Box/Label text
What to do if the text is not visible?
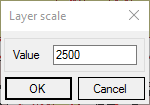
If the text is not visible, it is propably due to a problem between the scale of the dataset and the height of the text. You have to modify the scale of the dataset. To do it, right-click/Scale on the overlay containing the text. In the new window, enter the scale and validate.
